How to Install a Car DAB Aerial Adapter Easily

Upgrading your car's radio experience has never been easier. By installing a car DAB aerial adapter, you unlock access to crystal-clear digital audio broadcasting (DAB) channels. Traditional FM radio is rapidly being replaced, with *over 51% of in-car radio use now relying on DAB technology*. This shift offers better sound quality, more station options, and fewer interruptions. Whether you're commuting or on a road trip, a DAB setup ensures you enjoy seamless entertainment. With this guide, you'll find the process simple and rewarding, transforming your car's audio system in no time.
Key Takeaways
Installing a car DAB aerial adapter enhances your radio experience with superior sound quality and access to more channels.
Gather essential tools like a screwdriver set, wire cutters, and electrical tape to ensure a smooth installation process.
Follow a step-by-step guide to connect the DAB antenna and adapter, ensuring all connections are secure for optimal performance.
Proper cable management is crucial; route cables neatly to avoid damage and ensure a professional-looking setup.
Test your DAB setup after installation to confirm it works correctly and enjoy crystal-clear audio on your drives.
If you encounter issues, check connections and antenna placement to improve signal reception and troubleshoot effectively.
Consider using a DAB converter if your car's radio doesn't support DAB input, allowing you to enjoy digital channels without replacing your entire system.
Tools and Materials Needed for Installing a Car DAB Aerial Adapter
Before diving into the installation process, you need to gather the right tools and materials. Having everything ready ensures a smooth and hassle-free experience. Here's what you'll need:
Essential Tools
Screwdriver set
A reliable screwdriver set is a must-have. You'll use it to remove panels or screws that secure your car's existing radio or antenna connections. Make sure the set includes both flathead and Phillips screwdrivers to handle different types of screws.
Wire cutters/strippers
Wire cutters or strippers are essential for managing cables during the installation. These tools help you trim or strip wires cleanly, ensuring proper connections without damaging the cables.
Electrical tape
Electrical tape is crucial for securing and insulating exposed wires. It prevents short circuits and keeps your setup safe and tidy.
Materials
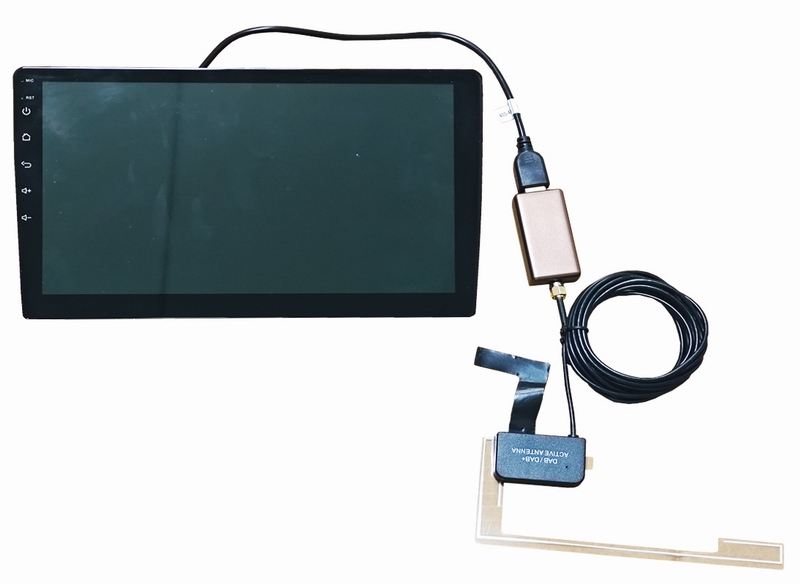
Car DAB aerial adapter
The car DAB aerial adapter is the centerpiece of this installation. It connects your car's existing antenna system to the DAB-compatible radio. Ensure the adapter matches your car's antenna connector type, such as Fakra or DIN. Some adapters, like those with built-in modules, provide phantom power to the antenna, which is necessary for certain setups.
Magnetic DAB aerial or adhesive mounting brackets
A magnetic DAB aerial is a popular choice for its ease of installation. You can place it on your car's roof for optimal signal reception. Alternatively, adhesive mounting brackets work well for securing the aerial inside the windshield. Choose the option that best suits your car and preferences.
User manual for your car's radio system
Your car's radio user manual is an invaluable resource. It provides details about the radio's input options and compatibility with DAB digital radio aerials. Refer to it throughout the installation process to avoid mistakes.
Optional Tools
Multimeter (for checking connections)
A multimeter helps you verify electrical connections. Use it to check for continuity and ensure the adapter and antenna are properly connected to the radio.
Panel removal tool (to access hidden areas)
A panel removal tool makes it easier to access hidden areas in your car without damaging the interior. It's especially useful for routing cables neatly along the car's interior.
Pro Tip: Organize your tools and materials before starting. This saves time and reduces frustration during the installation.
By preparing these tools and materials, you're setting yourself up for a successful installation. With everything in place, you're ready to move on to the step-by-step guide.
Step-by-Step Guide to Install a Magnetic DAB Car Aerial
Step 1: Prepare for Installation
Before you begin, preparation is key. Follow these steps to set yourself up for success:
Park your car in a safe, well-lit area and turn off the ignition.
Safety comes first. Make sure your car is parked securely, away from traffic or distractions. A well-lit space ensures you can see everything clearly during the installation.Gather all tools and materials listed above.
Having everything within reach saves time and avoids interruptions. Double-check that you have the car DAB aerial adapter, magnetic DAB aerial, and tools like screwdrivers and wire cutters.Read the user manual for your car's radio system to understand its input options.
Take a moment to review the manual. It helps you identify the correct input for the DAB connection and ensures compatibility with the adapter.
Pro Tip: If you’re unsure about your car’s radio input type, look for labels near the antenna port or consult the manufacturer’s website.
Step 2: Connect the DAB Antenna and Adapter
Now it’s time to connect the components. This step ensures your car’s radio can receive DAB signals effectively.
Locate the existing aerial connection point in your car.
Most cars have the aerial connection near the back of the radio unit. You may need to remove a panel or cover to access it. Use a panel removal tool if necessary to avoid damaging the interior.Disconnect the old aerial (if applicable) and attach the DAB aerial adapter.
Unplug the current aerial cable from the radio. Then, connect the car DAB aerial adapter to the same port. Ensure the adapter fits snugly and matches the connector type, such as Fakra or DIN.Secure the adapter in place using adhesive pads or a magnetic DAB aerial.
If you’re using a magnetic DAB aerial, place it on the roof of your car. This location provides the best signal reception. For adhesive-mounted aerials, choose a location for the aerial inside the windshield where it won’t obstruct your view.
Personal Experience: Many users find that magnetic DAB aerials outperform internal windscreen antennas. They’re easier to install and deliver stronger reception, especially in areas with weak signals.
Step 3: Route the Cables for the DAB Antenna
Proper cable management is essential for a clean and functional setup. Follow these steps to route the cable to the radio effectively:
Run the adapter's cable neatly along the car's interior, avoiding sharp edges or moving parts.
Start from the aerial and guide the cable toward the radio. Keep it away from hinges, pedals, or any moving parts that could damage it. Use existing gaps or channels in the car’s interior to hide the cable.Use cable ties or clips to secure the cable in place.
Fasten the cable along its path to prevent it from shifting or tangling. Cable ties or adhesive clips work well for this purpose. A tidy setup not only looks professional but also ensures the cable stays intact over time.
Pro Tip: Test the cable length before securing it. This ensures you have enough slack to connect the adapter without straining the cable.
By completing these steps, you’ve successfully installed the magnetic DAB aerial and connected the car DAB aerial adapter. The next step is to test the setup and enjoy your upgraded radio experience.
Step 4: Test the DAB Setup
Testing your setup is the final step to ensure everything works perfectly. Follow these steps to confirm that your car's DAB system is ready to deliver high-quality digital audio.
Turn on your car's radio and switch to DAB mode.
Start by turning on your car's ignition and powering up the radio. Locate the mode selection button on your radio interface. Switch it to DAB mode. If you're unsure where this button is, check the user manual for guidance. Once in DAB mode, your radio should display a menu or prompt for scanning channels.
Quick Tip: If your radio doesn’t switch to DAB mode, double-check the connection between the adapter and the radio. A loose connection can prevent the system from recognizing the adapter.
Scan for available DAB channels to ensure the adapter is working correctly.
Initiate a channel scan using the radio's menu. This process allows the system to search for all available DAB channels in your area. Depending on your location, the scan might take a few seconds to a couple of minutes. Once the scan completes, a list of stations should appear on the screen.
If the scan doesn’t find any channels, reposition the magnetic DAB aerial. Placing it on the roof of your car often provides the best reception. Many users report that magnetic DAB aerials outperform internal windscreen antennas, especially in areas with weak signals. After adjusting the aerial, run the scan again.
Pro Tip: Drive to an open area if you’re in a location with tall buildings or heavy interference. This can improve signal strength during the scan.
Once the channels appear, select one to test the audio quality. Listen for clear sound without interruptions. If the audio is distorted or cuts out, inspect the cable routing. Ensure no sharp edges or moving parts are interfering with the cable.
By completing these steps, you’ve successfully tested your DAB setup. Enjoy the enhanced sound quality and variety of stations that DAB technology brings to your car.
Troubleshooting Tips for Your Car DAB Aerial Adapter
Even with careful installation, issues can arise with your car DAB aerial adapter. Don’t worry—most problems are easy to fix. Below are some common issues and practical solutions to get your DAB system working perfectly.
No Signal or Poor Reception
A weak or nonexistent signal can ruin your listening experience. Here’s how to address it:
Check the connection between the adapter and the radio.
Start by inspecting the connection between the car DAB aerial adapter and your radio. A loose or improperly seated connection can disrupt the signal. Unplug the adapter, then reconnect it firmly. Ensure the connector type, such as Fakra or DIN, matches your radio’s input.
Expert Insight: DAB technology is designed to deliver clearer sound by encoding digital data into a carrier wave. However, even minor disruptions in the connection can prevent the receiver from decoding the signal properly.
Ensure the DAB antenna is mounted in a location with minimal interference.
The placement of your DAB antenna plays a huge role in signal quality. For magnetic antennas, position it on the car roof, away from obstructions like roof racks or metal objects. If you’re using an adhesive-mounted antenna, place it high on the windshield, avoiding areas with heating elements or tinted film.
Quick Tip: Open areas provide better reception. If you’re parked near tall buildings or trees, try moving to a clearer location before testing the signal again.
Adapter Not Compatible with Radio
Sometimes, compatibility issues can prevent your setup from working. Here’s what you can do:
Verify that your car's radio supports DAB input or consider using a DAB converter.
Check your radio’s user manual to confirm it supports DAB input. If it doesn’t, you’ll need a DAB converter. These devices allow you to enjoy DAB channels even if your radio isn’t natively compatible. They work by transmitting the DAB signal to your radio via FM or auxiliary input.
Pro Tip: When buying a converter, ensure it supports the “dab antenna to SMA” connection if your setup requires it. This ensures seamless integration with your existing components.
Loose or Exposed Wires
Exposed or unsecured wires can cause interruptions or even damage your system. Here’s how to fix it:
Inspect all connections and secure any loose wires with electrical tape.
Carefully examine the wiring along the entire route from the DAB antenna to the adapter. Look for loose connections, frayed wires, or exposed sections. Use electrical tape to insulate any exposed wires and prevent short circuits. Secure loose cables with cable ties to keep them from shifting or tangling.
Safety Note: Avoid routing wires near sharp edges or moving parts. This prevents wear and tear that could lead to future issues.
By following these troubleshooting tips, you can resolve most issues with your car DAB aerial adapter. Whether it’s a signal problem, compatibility issue, or loose wiring, these steps will help you get back to enjoying crystal-clear DAB radio in no time.
Installing a car DAB aerial adapter transforms your driving experience. You gain access to high-quality digital audio channels that make every journey more enjoyable. This guide simplifies the process, helping you set up a magnetic DAB aerial or other options with ease. With the right tools and preparation, you can complete the installation quickly and confidently. Once installed, you’ll enjoy clearer sound and a wider variety of stations. Upgrade your car’s audio system today and experience the benefits of DAB technology firsthand.
FAQ
What is a DAB aerial adapter, and why do you need it?
A DAB aerial adapter connects your car's radio system to a digital audio broadcasting (DAB) antenna. It allows your radio to receive DAB signals, which offer clearer sound and more consistent reception compared to traditional AM/FM broadcasts. If you want better audio quality and access to a wider range of stations, installing a DAB aerial adapter is a must.
Can I install a DAB aerial adapter in any car?
Yes, you can install a DAB aerial adapter in most cars. However, you need to check if your car's radio supports DAB input. If it doesn’t, you can use a DAB converter to make it compatible. Always refer to your car's radio manual to confirm compatibility before starting the installation.
Where should I place the DAB antenna for the best signal?
For the best signal, place a magnetic DAB antenna on the roof of your car. This location minimizes interference and maximizes reception. If you're using an adhesive-mounted antenna, position it high on the windshield, away from heating elements or tinted areas. Proper placement ensures you get the clearest sound possible.
Do I need special tools to install a DAB aerial adapter?
You don’t need many tools, but a few essentials make the process easier. A screwdriver set, wire cutters, and electrical tape are must-haves. Optional tools like a multimeter or panel removal tool can help with cable management and connection checks. Having the right tools ensures a smooth installation.
How long does it take to install a DAB aerial adapter?
The installation process usually takes about 30 minutes to an hour. The time depends on your experience and how easily you can access your car's radio and antenna connection points. Preparing your tools and materials beforehand can speed up the process.
What should I do if my DAB radio doesn’t pick up any channels?
If your DAB radio doesn’t find channels, check the connection between the adapter and the radio. Ensure the antenna is securely mounted in a location with minimal interference. You might also need to reposition the antenna or move to an open area to improve signal strength. Running another channel scan after adjustments often resolves the issue.
Can I use a DAB aerial adapter if my car doesn’t have a DAB radio?
Yes, you can still enjoy DAB channels even if your car doesn’t have a DAB radio. A DAB converter lets you connect the adapter to your existing radio system. These converters transmit the DAB signal through FM or auxiliary input, making it easy to upgrade without replacing your entire radio.
Is a magnetic DAB aerial better than an adhesive-mounted one?
Magnetic DAB aerials often provide better reception because they can be placed on the car roof, where interference is minimal. Adhesive-mounted aerials work well too, especially for cars without accessible roofs. Choose the option that suits your car and driving environment best.
Will installing a DAB aerial adapter damage my car?
No, installing a DAB aerial adapter won’t damage your car if done correctly. Use proper tools and follow the instructions carefully. Avoid routing cables near sharp edges or moving parts to prevent wear and tear. If you’re unsure, consult a professional installer for assistance.
What are the main benefits of upgrading to DAB technology?
Upgrading to DAB technology enhances your radio experience in several ways:
Superior sound quality: DAB provides clearer and more consistent audio than AM/FM.
More station options: Access a wider variety of channels, including niche and regional stations.
Better reception: DAB signals perform well in urban areas and remote locations, reducing interruptions.
With these advantages, switching to DAB makes every drive more enjoyable.
See Also
Simple Steps to Change Your Car Key or Fob
Effortless Ways to Swap Your Car Key or Fob
Quick Guide to Replacing or Duplicating Car Keys

iSun Digitech Limited
Contact : Coco Huang
E-mail: sales@iasun.cn